Introduction
When collecting data
from the field there are many ways to prepare for the influx of data. One of
the most efficient ways to store data using ArcMap is to create a geodatabase
and to set domains within a feature class. For this exercise a feature class was
created which will display information regarding the micro-climate of the University
of Wisconsin Eau Claire’s campus.
Part 1. Pre-Planning
A micro-climate map
displays descriptive data regarding certain elements of a climate. For this
exercise we will be focusing on temperature, dew point, wind speed, azimuth,
and direction, relative humidity, notes, and snow depth (assuming snow will not
have melted by the time of data collection). In previous exercises data was
entered into ArcMap after it was collected but now we will be using ArcPad
which is a small scale version of ArcMap which allows for easy data entry into
a feature class that can be transferred to ArcMap.
Before data entry
occurs it is best practice to set domains on the fields within a feature class.
Each domain is set up to set limits on descriptive values such as integers or
text fields. These limits can severely cut down on data entry errors. For
example if you are entering data for weather it is safe to assume you will not
have a temp of 150 degrees. With a domain you can set a range for the data so
that errors like these do not occur.
Planning ahead before
data collection occurs can save valuable time when processing data. Creating a
geodatabase to store feature classes is just one step of data entry. Utilizing
domains within the feature class will assist with data entry.
Part 2. Domains and Feature Class Creation
Setting up the
micro-climate database for deployment to ArcPad requires several steps. First,
a new File Geodatabase must be
created within our assignment folder. To achieve this, within ArcMap we
connected to our respective folders and right-clicked the folder selection add > new file geodatabase (Figure
1.)
 |
| Figure 1. Create a new File Geodatabase. This will contain a Feature Class that will have Domains associated with it for data collection. |
Once the Geodatabase
is created we can setup domain types by going into the properties section. In
ArcMap, right-click on the geodatabase then select properties. The window that appears will allow you to set the domain
properties. Within this window use the Domain Name field to enter the different
kinds of data which will be collected and give a brief description in the
Description field. After entering a Domain Name and Description look at the
bottom half of the window in the Domain
Properties section. Here is where limits will be set. For Temperature, the
Field Type would be Float. Float allows for integers to be displayed with decimals.
The Domain Type will be Range since there will be a range of temps collected.
The Minimum value depends on the time of year but in Eau Claire it is safe to
put down -20 (Fahrenheit) and a Maximum of 99. All other Domain Properties can be left at Default Value. The Coded Values section is for entering one
or two letter/digit values which will represent something such as using N for
North. Coded Values are suggested for Wind Direction. Figure 2 shows a
completed Domains section for this exercise.
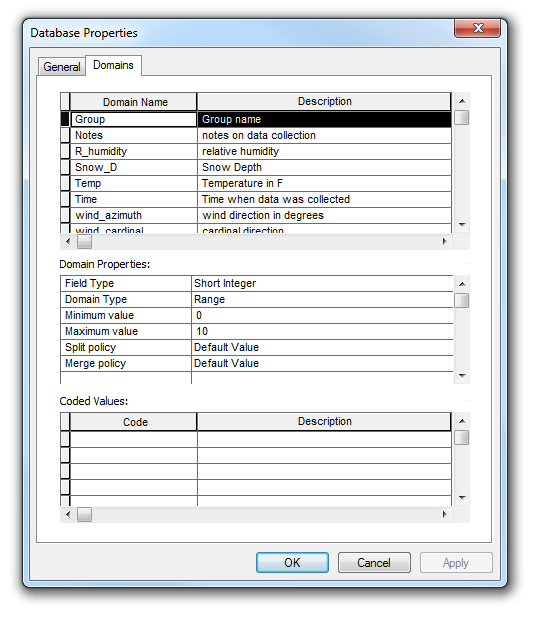 |
| Figure 2. Create Domains by setting a Domain Name, Description, and Domain Properties. Coded Values should be used for wind direction or anything else that uses abbreviations. |
After the domains
have been set create a new feature class within the Geodatabase by
right-clicking on the database and selecting New > Feature Class… (Figure 3).
 |
| Figure 3. Create a new point Feature Class for the data to collected into. |
For the purpose of
this exercise we created a Point feature class. Once created, enter the
properties of the feature class and select the Fields tab. This will allow you to
enter new Fields and to associate them with the domains created earlier. In the
Field Name section enter the name of the data to be collected and give it a
Data Type. In the Field Properties section below click on the box next to
Domain to associate a domain with the new Field Name (Figure 4). Only Domains
with the same Data Type will be shown so make sure you remember what kind of
Data Type you gave to each piece of data you want to collect.
 |
| Figure 4. Associate the Domains with the Field Names. The Field Names should represent the data to be collected. The Domains will set limits to the data that can be entered for each field. |
Now that the Field
Names have been set and Domains have been associated with them it is now time
to prepare for data entry with ArcPad. In ArcPad a base map will be needed so
that we can tell where we are when collecting data. This is done by importing a
raster of the study area to our geodatabase. The study area for this
Micro-Climate is the University of Wisconsin Eau Claire’s campus. Our professor
has already acquired a raster for us to use. We were required to import this
raster into our geodatabase from his. To import a raster right-click on the geodatabase you want it to be imported into then
select Import > Raster Datasets… (Figure
5.)
 |
| Figure 5. Import a Raster Dataset to be the basemap that will appear on the ArcMap interface. |
Once the raster base
image has been imported the geodatabase will contain the necessary components to
collect data. One more step must be accomplished before saving the map
document; connecting the geodatabase to the map document. To do this click on File in ArcMap and select Map Document Properties… This opens the
Map Document Properties window. At the bottom of this window set the Default
Geodatabase to the one you just created and check the box next to Pathnames
(Figure 6.)
 |
| Figure 6. Set the default geodatabase and store relative pathnames. This allows for data to be stored directly into the specified geodatabase and if files get moved around the Pathnames will allow for the files to be retrieved saving precious time. |
No comments:
Post a Comment